

This project is very easy to do. If you stay with it you can get this
done in a day. This is a mini tutorial in which you will need to refer
to my perfect straight cut tutorial on my Christmas blog link located on
this blog.
To make this Spooky Wall you will need two inch styrofoam, one box of the Dept.56 Spooky Wrought Iron Fence, one bottle each of FolkArt Acrylic paint including Burnt Umber, Burnt Sienna, Honeycomb or Tumbleweed, Med. Grey and Black. Also a bottle of Mat or Satin Varnish.
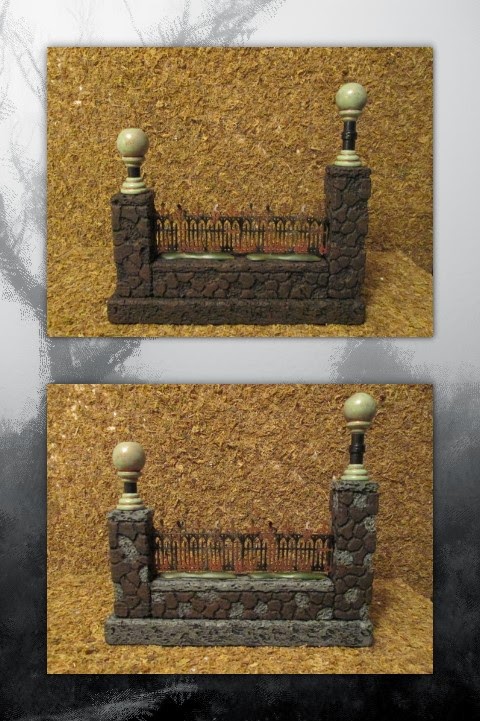
We will start by cutting out the basic shapes of the wall. Short pillar is 1-1/4 x 1-1/4 x 3-1/2 in.. Tall pillar is 1-1/4 x 1-1/4 x 4-1/2 in.. Wall section is 1-1/4 x 1-1/4 x 6 in.. Base is 3/4 x 1-3/4 x 8-3/4 in.. Make sure that when you cut your wall section that you run your hot wire on the outside of your mark. Remember that your wire will melt about a 3/32 of an inch from your styro so you want to make sure your wall section is exactly the same length as your two wrought iron fences put together. At this time DO NOT GLUE your pieces together.
Start carving your detail using your hot wire sculpting knife. Draw a line 1/4 inch down from the tops of your pillars and wall section to create a cement cap. Burn a line on all sides just below your lines using a metal ruler.
To make this Spooky Wall you will need two inch styrofoam, one box of the Dept.56 Spooky Wrought Iron Fence, one bottle each of FolkArt Acrylic paint including Burnt Umber, Burnt Sienna, Honeycomb or Tumbleweed, Med. Grey and Black. Also a bottle of Mat or Satin Varnish.
We will start by cutting out the basic shapes of the wall. Short pillar is 1-1/4 x 1-1/4 x 3-1/2 in.. Tall pillar is 1-1/4 x 1-1/4 x 4-1/2 in.. Wall section is 1-1/4 x 1-1/4 x 6 in.. Base is 3/4 x 1-3/4 x 8-3/4 in.. Make sure that when you cut your wall section that you run your hot wire on the outside of your mark. Remember that your wire will melt about a 3/32 of an inch from your styro so you want to make sure your wall section is exactly the same length as your two wrought iron fences put together. At this time DO NOT GLUE your pieces together.
Start carving your detail using your hot wire sculpting knife. Draw a line 1/4 inch down from the tops of your pillars and wall section to create a cement cap. Burn a line on all sides just below your lines using a metal ruler.

After i have carved out my cobblestone i like to randomly remove pieces of my cobblestone giving the wall a worn and battered look. After you finish carving your details you can now glue your pieces together. I usually let my project dry over night to make sure they are bonded well, but you may be able to start painting after you let the glue set for about two to four hours.
Now start applying two coats of black on the entire wall. Once it dries, touch up any white spots that you see. Don't worry if you miss some spots. I have learned that when you apply your varnish it will make your other colors bleed a little which will help fill in those areas.
Now start applying two coats of black on the entire wall. Once it dries, touch up any white spots that you see. Don't worry if you miss some spots. I have learned that when you apply your varnish it will make your other colors bleed a little which will help fill in those areas.

Next you want to dry brush a coat or two of the Burnt Umber on the
entire wall and base. Dry brush your Grey to the pillar and wall caps,
base and the removed sections of the cobblestones.
For your final colors dry brush Burnt Sienna and Honeycomb to your
cobblestone. Finish it off with a coat of Mat or Satin varnish to bring
out all those colors and seal your project.

You may have noticed my finials i added to the pillar tops. These are
wood craft items you can get at your local craft store. You will need
for one finial, one one inch wood ball knob, two 3/4 in. wood buttons,
one 7/8 in. wood button and one 5/8 x 1/2 in. wood spool. Once glued,
base coat your finial black. Next dry brush a coat or two of FolkArt
Metallic Copper leaving the center part of your spool black. dry brush
your last color FolkArt Bayberry. Finish it off with a coat of Mat
Varnish.
Hello there! I know this is kinda off topic but I was wondering if you knew where I could get a captcha plugin for my comment form? I'm using the same blog platform as yours and I'm having trouble finding one? Thanks a lot!
ReplyDeleteI have been browsing online more than 3 hours today, yet I never found any interesting article like yours. It's pretty worth enough for me. In my view, if all webmasters and bloggers made good content as you did, the web will be a lot more useful than ever before.
ReplyDelete